
You may need to migrate your website/business for a specific reason. As SEOs, we call this “migration” or “site move”. An improperly prepared migration can result in a significant decrease in your organic traffic. In this guide, I will share how you can get through your site migration process in the most seamless way.
Why do you need to migrate your website? There may be one or more reasons for this.
First, let’s take a look at the migration types
- Domain Change:
You may want to move your x.com site to y.com - URL Structure Change:
URLs with words that are relevant to your site’s content and structure are friendlier for visitors navigating your site. If the urls of the site are not SEO-friendly, you may want to change them. - HTTP > HTTPS Migration:
Security is a top priority for Google. If you migrate your site from HTTP to HTTPS, Google treats this as a site move with URL changes. This can temporarily affect some of your traffic numbers. - Platform Change:
Site platform is what our site is built on. You could have created your website on WordPress, Shopify, Wix, or any other platform. Also, you could have a custom site created by a dev team. You may want to switch to a better platform. When changing the platform on which your site is built, we should test the SEO functions of your new platform. - Structure and Hierarchy Changes:
Your website may start to serve in a completely different area. Or your site’s URL and category structure may not be SEO-friendly. Regardless of the reason, we can start to work on a completely new site. - Server Change:
Server migrations present risk primarily in terms of page load speed. Site speed is an SEO ranking factor, but more importantly, it’s a user experience & conversion rate issue. You may think to set up a staging site on the new server and test page speed on it. Also, don’t forget to check redirects to ensure they behave as expected. - Separate Mobile Site Migration:
Google recommends Responsive Web Design as the design pattern as it is the easiest to implement and maintain. So you can plan to redirect your m-dot version to the main responsive version. Doing a redirect there is absolutely the right thing. This is something that should be fairly straightforward and should be fairly easy to do.
If the whole structure remains the same, only the domain changes (1st migration type), it is possible to say that our job is easy. In other migration types or when more than one migration type is combined, things can be more complicated.
There are dozens of examples that experienced massive traffic loss during migration.
Some errors that cause traffic loss when moving a site:
- Lack of planning
- Low SEO and UX knowledge
- Low budget
- Redirection issues
- URL mapping errors
- Crawling errors
- Do not interfere with instant errors
In order not to encounter these problems, you will find the right planning strategy and the points to be considered in the continuation of the article.
Before I begin, I want to warn you about a few things:
- ! Google does not recommend making both design and URL structure changes at the same time. If possible, it is useful to do these two or more types of migration at different times, step by step.
- ! If the site is being moved to a different domain, the history of the new domain address should be investigated. Archive.org, “yoursite.com” search query and audit tools will work. If there is a domain registration or a site established before, it needs to be reconsidered. Installing a domain with a brand entity in Google, which has been exposed to issues such as spam links or hacking, or by serving on a completely different subject, will cause a large part of the traffic to be lost.
- ! In some cases, even if the migration planning and implementation is done without any problems, there is a possibility that the organic traffic will decrease by 15% or more. Since there is an important structure change on the site, Google re-learns and evaluates each page one by one. This period is usually a few weeks but can be longer for large sites. If everything goes well, your organic traffic will gain positive momentum in a very short time after this evaluation.
- ! The site should not be closed to users during or before the migration. If a design or structure change is to be made, you can announce this information to your audience in advance with simple methods. (Carousel, e-mail, SMS, push-notification, etc.) Pages with different status codes or warning messages may be interpreted negatively by Googlebot.
- ! The moment of migration (launching the new structure) should be in the time zone where the website receives the least traffic. In this way, in case of encountering undesirable problems, the number of the audience that will be affected will be kept at a minimum level. In addition, during these hours when the server load is low, Googlebot will crawl and index the new site faster.
Planning and Data Collection
A project plan that doesn’t skip any step of the move ensures that work progresses without errors. When the work plan is determined, the distribution of tasks will become clear. This plan needs to be made at least 30 days before the migration.
It is important to keep current visitor data. According to the size of your web project, it is necessary to group the pages and queries with the highest traffic.
Tip: Keeping log files covering 45 days before the migration date allows you to analyze Googlebot’s behavior and take immediate action if there is a difference.
Create Test Site and Disallow
The migration process starts with wireframes for SEOs. If the wireframes are checked and SEO comments are made during the creation of the wireframes, the changes to be made in the test site are reduced. This allows the project to progress faster. This also makes the work of UX/UI designers easier.
It is also important to turn off bot access to the test site. Otherwise, you can experience that your new pages are included in the Google index in a very short time.
How to disallow search engine bots by robots.txt file?
Create a robots.txt file: You can create a file named test.example.com/robots.txt and execute the following commands:
——
User-agent: *
Disallow: /
# This command blocks all bots from accessing my website.
——
User-agent: Oncrawl
Allow: /
# This command only allows the “Oncrawl bot to access my website.
—–
It is possible to decide which bots to test with and to define the trace to the user-agent through the robots.txt file. Oncrawl has features that will make things much easier.
IP restriction: If you are involved in the migration plan of a company’s website, you can only open access to the company IP and disable access to all other IPs in order to prevent the new project from being exposed. In this case, you will need to give private IP access to the agency or consultants you work with, if any. Even if you do the IP restriction, you must disallow bots by robots.txt file.
Password protection: An ID and password combination can be created to enter the test site. Crawling applications such as Oncrawl have password access features.
Noindex Tag: A noindex meta tag can be added to the head section of all pages in order to prevent the test site pages from being indexed by Google.
Tip: One of the most common mistakes is forgetting to remove the noindex tag after migrating to the new website. Remember to confirm that the tags are updated to index, follow at the time of migration.
Performance Tracking with Google Analytics
One of the most important points for performance tracking is to continue from the same Google Analytics account without data loss. Therefore, the existing GA and GTM code must be active on the new site with the migration.
Generating a new GA code makes it harder for you to measure your web performance.
Adding a reminder to your Google Analytics dashboard on the day of the move will make it easier for you to compare performance later.
Creating Existing URL List
I mentioned at the beginning of my article that if we are only changing our domain name, our job is easy. We can apply this in bulk from the .htaccess file with the following or a similar code.
* The .htaccess file is a configuration file located on Apache servers.
RewriteEngine On RewriteCond %{HTTP_HOST} ^oldsitee\.com$ [OR]
RewriteCond %{HTTP_HOST} ^www\.newsite\.com$
RewriteRule (.*)$ https://newsite.com/$1 [R=301,L]
This ruleset will ensure that the domain address automatically 301 redirects to https://newsite.com when any url is reached at oldsite.com or www.oldsite.com.
However, if your job is to fix an incorrect URL structure, things get complicated here. I explained this situation later in the article.
Now we are at one of the most important points of the migration process. Getting the full list of important URLs for the current site is key. If you forget a URL with a lot of visitors and a high PageRank, and leave it out of migration, be prepared for a drop in your organic traffic.
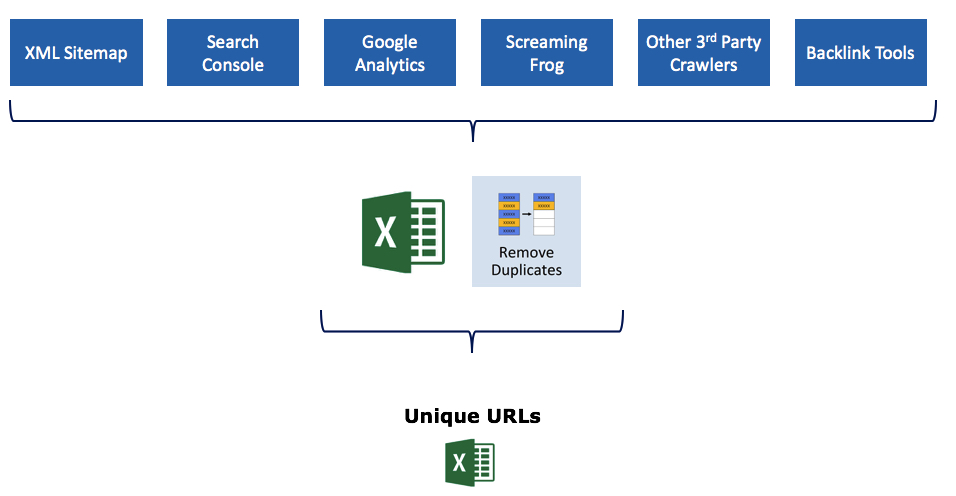
Tip: By exporting URLs from more than one source, you can ensure that no URL is left out.
Starting with XML Sitemap is always the right step. To simply transfer the URLs in your XML file onto the spreadsheet, you can copy the link here and write your own sitemap url instead of https://www.sinanyesiltas.com/post-sitemap.xml in the first line.
- All URLs with impression in Search Console,
- All URLs with page views through Google Analytics,
- All URLs obtained as a result of crawling with Oncrawl,
- Moving forward using multiple 3rd party crawling tools ensures that the job is clear. It is essential to make sure that no URL is left out by taking advantage of the different features of each crawling application.
- It is important to include pages that have already obtained links here. For this, it is necessary to discover the linked pages through Search Console, Ahrefs, Semrush and Majestic tools and add them to the same document.
After obtaining all the URLs, you will have a grouped data similar to the one below in a single Excel document.
We got many different excel sheets with available URLs. It’s time to combine them all into one file and make it unique. We continue on our way with a document where there are no matching URLs, your current URLs are listed and no important URLs are left out. The ALL tab in the image represents the area I’m talking about.
URL Mapping (Old – New URL Mapping)
In the project where the URL structure has changed, the existing URLs need to be matched with the new URLs. An SEO that will do this in the best way can ensure that the migration process goes smoothly and without loss.
It is necessary to match the new URL against each of the existing URLs in the document we created in the previous step. You can directly share this document you will complete with the IT team, and request the identification of redirections via the .htaccess file. Or you can do it yourself.
There are critical things to consider in this step:
- 301 server-side redirection should be used in the redirects to be applied. This redirect type permanent redirects page X to page Y and ensures that all the value of page X is transferred to page Y. Using 302, 307, JS, Meta or other redirection types is a very critical mistake in the migration process.
- Do not include URLs that have no visitors, poor content, and that you think are hurting your crawling budget in your URL Mapping file. Remember that Google has reserved a space for your site in its data center and you should use this space with your most efficient pages. If you have identified an unnecessary page group, make these pages respond with the 410 status code.
Why 410? The 410 status code, unlike 404, says that this page is now deleted and will not be active again. In case you use 404 status code, Googlebot visits your server to check if the same page is active again. By eliminating these visits, 410 is an important solution to use your crawl budget efficiently. - Do not redirect multiple pages to a single page in bulk. This causes confusion for both users and bots. Instead of applying a bulk 301 for pages you don’t use and find to be unproductive, review solution 410.
- If you are in the migration process of an e-commerce site with thousands of pages, it is not possible to prepare one-to-one mapping for each URL. In this case, you can guide your IT team by preparing patterns.
Image Redirections
Images are also included in site migration and redirection mappings. One of the most common mistakes we see is that image orientations are not included in the migration. In order not to lose the rankings and values obtained in Google Images, it is important to prepare a separate URL mapping for the images. Migration work should be looked at URL-based, not page-based.
How to do?
- Crawl your image files with Oncrawl.
- You can analyze your image sources that obtain backlinks with Ahrefs, Semrush and Majestic.
- You can parse the pages with your images via Search Console > Search Type > Image.
- Collect all the URLs you get in the same excel format that we did for the pages, eliminate the duplicates and complete your mapping setup.
(If Domain is Changing) Google Address Change Tool
After completing all the preliminary work and activating the redirects, there is a tool that allows us to specify the site move to Google and makes things easier: Address Change Tool. Signals will be handled in less time after selecting old site and new sites in this tool.
- Search Console property ownership is required for both the old site and the new site.
- Address change is only used for domain changes. Not available for sub-folder url changes or HTTP > HTTPS migrations.
- In this change tool, it is necessary to handle each sub-domain separately, if any.
- When these conditions are met, the process can be started by selecting the old and new sites with the Google Change Address Tool.
Link Updates
The website will now have a new URL structure. In this case, all links on the site should work in the new version. If the old URLs continue to be used in the links within the site, many pointless redirects will work. Therefore, the following links must be checked:
- All internal links within the page
- Canonical tags
- -If any- Hreflang tags
- -If any- Alternate tags
- -If any- HTML Sitemap links
- Social media profile links
- Landing Page links used in ad campaigns
Tip: If you have changed your entire URL structure, I recommend keeping your XML sitemap file with the old URLs for a while. Create a separate XML sitemap with your new URL structure. Keep sending old URLs to Googlebot for a while. In this way, Googlebot will speed up the process of seeing and indexing the redirect on old urls. Depending on the site size, I recommend keeping your XML sitemap file active at least 1 month old.
Controls
After the redirects are applied, it is necessary to confirm that the status code of each URL is 301 by crawling the old URLs obtained before. Here, it is very important to take quick action when URLs with status code other than 301 are detected.
Other checkpoints to watch out for:
- Robots.txt file
- Google Analytics tracking code
- Search Console verification control (if the domain has changed, it should be continued with 2 different domains, old and new)
- Meta tag (noindex, follow)
- Canonical tag
Also note these:
- If possible, backlink providers should be contacted and old links should be replaced with new ones. If there is a large backlink network, a planning can be made in order of importance and only the important ones can be contacted./li>
- Landing pages used in advertising campaigns should be reviewed or the relevant teams should be informed.
- By crawling the new site, it should be checked whether all links are working smoothly, and if a redirect loop occurs within the site, immediate intervention should be taken.
- Links in social media profiles should be updated.
- Indexing of new pages should be followed.
- Keyword performance should be monitored.
- 301 redirects should not be deactivated any time soon, they should always remain active.
- If the domain has been changed; The old domain must be kept for a minimum of 2 more years.
- Old data (URLs, logs, keyword performances, etc.) should be kept for a while.
- If a disavow file is installed on the old site, it should also be uploaded to the new domain.
Google handles the routing setup between the old and new site for 180 days. After the 180-day period, it does not recognize any association between the old and new sites and treats the old site as an irrelevant site if it is still present and crawlable.